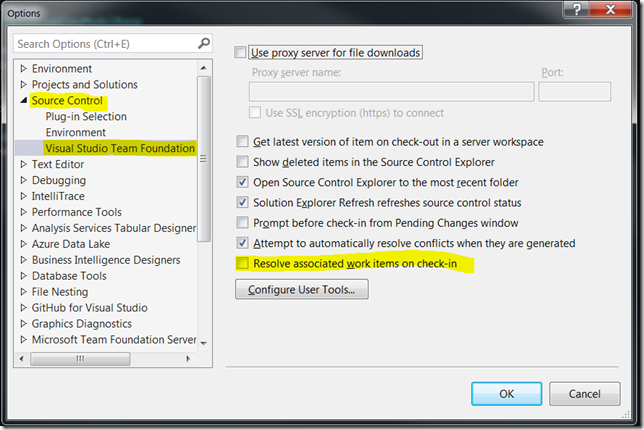
On my new team we use Work Items to track our progress, and I love it . However, there is one thing that has bugged me, the default status when assocaiting my checking wiht a Work Item is Resolved. Well that is not how I work. I check in frequently, so I wanted to see if I could change it so that Associate is the default. Found this User Voice Discussion that had just what I needed. I am recapping it here to save a few clicks.
Visual Studio 2015

Visual Studio 2013
Available in Visual Studio 2013 Update 4 or you can use the following registry hack.
[HKEY_CURRENT_USER\Software\Microsoft\VisualStudio\12.0\TeamFoundation\SourceControl\Behavior]
"ResolveAsDefaultCheckinAction"="False"
I have not test. As always when editing the registry by hand, make a backup and proceed with caution.
Other Obervations
That same thread also states that this could be cause becuase the Work Item original state is still in “To Do” and if it is transitioned then it will default to Associate.
I just got a new laptop at work and when setting up Git moved to Git For Windows. One challenge I ran accross was where to put my aliases. I have several I used that made my life easier.
Step 1 – Find the location of the git config file
To do this I opened gitbash and executed $ git config --list --show-origin
Which produced the following:
$ git config --list --show-origin
file:"C:\\ProgramData/Git/config" core.symlinks=false
file:"C:\\ProgramData/Git/config" core.autocrlf=true
file:"C:\\ProgramData/Git/config" core.fscache=true
file:"C:\\ProgramData/Git/config" color.diff=auto
file:"C:\\ProgramData/Git/config" color.status=auto
file:"C:\\ProgramData/Git/config" color.branch=auto
file:"C:\\ProgramData/Git/config" color.interactive=true
file:"C:\\ProgramData/Git/config" help.format=html
file:"C:\\ProgramData/Git/config" http.sslcainfo=C:/Program Files/Git/mingw64/ssl/certs/ca-bundle.crt
file:"C:\\ProgramData/Git/config" diff.astextplain.textconv=astextplain
file:"C:\\ProgramData/Git/config" rebase.autosquash=true
file:"C:\\Program Files\\Git\\mingw64/etc/gitconfig" credential.helper=manager
As you can see my git config file is located in “C:\ProgramData\Git\config”. I am sure that this is due to some policy that is on the laptop becuase this is not where the documenation says it should be.
Step 2 – Add the aliasas
Now that I know where the config file is I can add the alisases, here are mine.
ci = commit --verbose
cn = commit --verbose --amend
ca = commit --verbose --all
cw = commit -m \"WIP\"
cm = commit -m
cc = commit -c
b = branch
bc = checkout -b
a = add
aa = add --update
ap = add --patch
c = checkout
f = fetch
pr = pull --rebase
pom = push origin master
r = rebase --interactive HEAD~10
rc = rebase --continue
ra = rebase --abort
s = status
sp = -p status # with pagination
ss = -p status -s
lg = log --graph --pretty=format:'%Cred%h%Creset -%C(yellow)%d%Creset %s %Cgreen(%cr) %C(bold blue)<%an>%Creset' --abbrev-commit --date=relative
lga = log --graph --pretty=format:'%Cred%h%Creset -%C(yellow)%d%Creset %s %Cgreen(%cr) %C(bold blue)<%an>%Creset' --abbrev-commit --date=relative --all
alias = config --get-regexp 'alias.*'
My updated config file looks like this now.
[core]
symlinks = false
autocrlf = true
fscache = true
[color]
diff = auto
status = auto
branch = auto
interactive = true
[pack]
[help]
format = html
[http]
sslCAInfo = C:/Program Files/Git/mingw64/ssl/certs/ca-bundle.crt
[diff "astextplain"]
textconv = astextplain
[rebase]
autosquash = true
[alias]
ci = commit --verbose
cn = commit --verbose --amend
ca = commit --verbose --all
cw = commit -m \"WIP\"
cm = commit -m
cc = commit -c
b = branch
bc = checkout -b
a = add
aa = add --update
ap = add --patch
c = checkout
f = fetch
pr = pull --rebase
pom = push origin master
r = rebase --interactive HEAD~10
rc = rebase --continue
ra = rebase --abort
s = status
sp = -p status # with pagination
ss = -p status -s
lg = log --graph --pretty=format:'%Cred%h%Creset -%C(yellow)%d%Creset %s %Cgreen(%cr) %C(bold blue)<%an>%Creset' --abbrev-commit --date=relative
lga = log --graph --pretty=format:'%Cred%h%Creset -%C(yellow)%d%Creset %s %Cgreen(%cr) %C(bold blue)<%an>%Creset' --abbrev-commit --date=relative --all
alias = config --get-regexp 'alias.*'
Step 3 Save and Test
Once I updated my config file, I saved it and then opened a new gitbash windows and BAM! All of may aliases were back. Happy Day!

This message has annoyed me for a long time. Today I found the solution thanks to this post “Users always asked to download tx.sap FILE VIA SAP PORTAL” on http://sap.ittoolbox.com.
The reply by Bozman had the solution that worked for me.
Here is the magic:
Windows Registry Editor Version 5.00
[HKEY_CURRENT_USER\Software\Microsoft\Windows\Shell\AttachmentExecute\{0002DF01-0000-0000-C000-000000000046}]
"SAPGui.Shortcut.File"=hex(0):
After installing this I was able to click the link in SAPLaunch and the SAP GUI opened without prompting. Pure Bliss!!!
Syncing my work calendar (Microsoft Outlook) with my Google Calendar so I can have my meetings on my phone is a must for me. Since August 1, 2014 when the Google Calendar Sync quit working I have used a lot of different offering that tried to solve this problem. Outlook Google Sync by rantsi was the closet to how I wanted it to work but it had a few issues. I committed a few fixes but then started working on how I would want it to work. Marble is the result of that effort. It uses the Google Calendar API v3 and either native Outlook Interop or NetOffice. NetOffice is still a bit experimental so use with caution.
Marble is available on GitHub, and at this time version 0.0.1.8 is stable using Outlook Interop (the default). Source Code, Binary, and Setup packages are all available on the release tab.
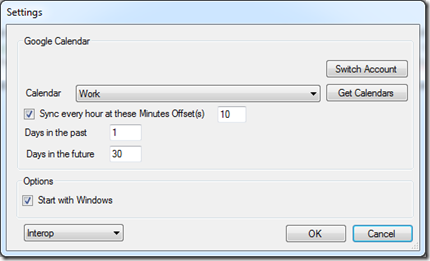
The Setup Screen

As you can see it is very simple, once you launch the Settings Screen you will be taken to your Google Account to authorize Marble to have access to manage your Calendars. You will then select which calendar you want events to be synchronized to.
Enable the Sync very hour and provide when on the hour you want it to sync. The screen shot will sync every hour at 10 minutes past.
The Days in Future and Days in past allows you to control the rolling window of time that events are synced in. This allows you to make update quickly.
Start with windows, really? I not going to explain that one.
There is no User Interface other than the Settings and About screens. Everything else is handled in the System Tray.
Please download it and give it a try. If you encounter issues please log them here
Enjoy!
During a recent project where I was creating a SharePoint feature I had the need to clear the browser cache before starting a new debug session. The feature was all JavaScript and I wanted to be sure I was getting the latest version. So, I added this command to the post build event.
InetCpl.cpl,ClearMyTracksByProcess 8
I have also used this in trouble shooting browser issues with clients, the easiest way to know for sure they have cleared their browser cache.